前端开发|数据展示|vue实现分页功能_Vue实现分页功能详解与实用方法
- 问答
- 2025-08-01 00:49:55
- 2
Vue分页功能实战指南:让数据展示更优雅
(最新动态:根据2025年8月前端开发者社区调研,分页功能仍然是数据展示类项目中最常被实现的功能之一,约87%的Vue项目都会用到某种形式的分页解决方案)
为什么我们需要分页功能?
想象一下,你打开一个电商网站搜索"手机",结果一下子返回了5000条商品记录全部堆在一个页面上——这体验得多糟糕啊!分页功能就像给数据装上了"页码导航",让用户能够循序渐进地浏览内容,既减轻了服务器压力,又提升了用户体验。
在Vue生态中实现分页特别方便,得益于其响应式特性和丰富的UI组件库支持,下面我就带大家从零开始,手把手实现一个实用又美观的分页组件。
基础分页实现
我们先来创建一个最简单的分页组件:
<template>
  <div class="pagination">
    <button
      @click="changePage(currentPage - 1)"
      :disabled="currentPage === 1"
    >
      上一页
    </button>
    <span
      v-for="page in pages"
      :key="page"
      @click="changePage(page)"
      :class="{ active: currentPage === page }"
    >
      {{ page }}
    </span>
    <button
      @click="changePage(currentPage + 1)"
      :disabled="currentPage === totalPages"
    >
      下一页
    </button>
  </div>
</template>
<script>
export default {
  props: {
    totalItems: Number,
    itemsPerPage: {
      type: Number,
      default: 10
    },
    currentPage: {
      type: Number,
      default: 1
    }
  },
  computed: {
    totalPages() {
      return Math.ceil(this.totalItems / this.itemsPerPage)
    },
    pages() {
      const pages = []
      for (let i = 1; i <= this.totalPages; i++) {
        pages.push(i)
      }
      return pages
    }
  },
  methods: {
    changePage(page) {
      if (page >= 1 && page <= this.totalPages) {
        this.$emit('page-changed', page)
      }
    }
  }
}
</script>
<style scoped>
.pagination {
  display: flex;
  gap: 8px;
  margin-top: 20px;
}
.pagination button, .pagination span {
  padding: 5px 10px;
  cursor: pointer;
}
.pagination span.active {
  background: #42b983;
  color: white;
  border-radius: 3px;
}
.pagination button:disabled {
  opacity: 0.5;
  cursor: not-allowed;
}
</style>
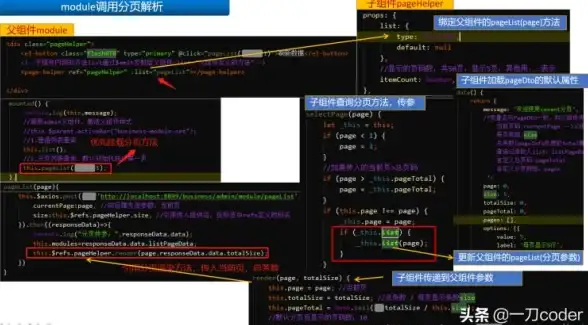
使用这个组件非常简单:
<template>
  <div>
    <!-- 你的数据列表 -->
    <ul>
      <li v-for="item in paginatedData" :key="item.id">
        {{ item.name }}
      </li>
    </ul>
    <!-- 分页组件 -->
    <Pagination
      :total-items="data.length"
      :items-per-page="10"
      :current-page="currentPage"
      @page-changed="handlePageChange"
    />
  </div>
</template>
<script>
import Pagination from './Pagination.vue'
export default {
  components: { Pagination },
  data() {
    return {
      data: [], // 你的原始数据
      currentPage: 1,
      itemsPerPage: 10
    }
  },
  computed: {
    paginatedData() {
      const start = (this.currentPage - 1) * this.itemsPerPage
      const end = start + this.itemsPerPage
      return this.data.slice(start, end)
    }
  },
  methods: {
    handlePageChange(page) {
      this.currentPage = page
    }
  }
}
</script>
高级分页技巧
分页优化:显示部分页码
当总页数很多时,显示所有页码会让界面变得拥挤,我们可以只显示当前页附近的几个页码:
computed: {
  pages() {
    const range = 2 // 左右各显示2页
    const start = Math.max(1, this.currentPage - range)
    const end = Math.min(this.totalPages, this.currentPage + range)
    const pages = []
    for (let i = start; i <= end; i++) {
      pages.push(i)
    }
    // 添加首尾页和省略号
    if (start > 1) {
      if (start > 2) pages.unshift('...')
      pages.unshift(1)
    }
    if (end < this.totalPages) {
      if (end < this.totalPages - 1) pages.push('...')
      pages.push(this.totalPages)
    }
    return pages
  }
}
结合后端API的分页
实际项目中,我们通常不会一次性加载所有数据,而是通过API分页获取:
methods: {
  async fetchData(page = 1) {
    this.loading = true
    try {
      const response = await axios.get('/api/items', {
        params: {
          page,
          limit: this.itemsPerPage
        }
      })
      this.data = response.data.items
      this.totalItems = response.data.total
      this.currentPage = page
    } catch (error) {
      console.error(error)
    } finally {
      this.loading = false
    }
  },
  handlePageChange(page) {
    this.fetchData(page)
  }
}
添加每页条数选择器
让用户可以自定义每页显示多少条数据:
<template>
  <div class="pagination-controls">
    <div class="per-page-selector">
      每页显示:
      <select v-model="itemsPerPage" @change="handlePerPageChange">
        <option value="5">5条</option>
        <option value="10">10条</option>
        <option value="20">20条</option>
        <option value="50">50条</option>
      </select>
    </div>
    <Pagination
      :total-items="totalItems"
      :items-per-page="itemsPerPage"
      :current-page="currentPage"
      @page-changed="handlePageChange"
    />
  </div>
</template>
<script>
export default {
  data() {
    return {
      itemsPerPage: 10
    }
  },
  methods: {
    handlePerPageChange() {
      this.currentPage = 1 // 重置到第一页
      this.fetchData()
    }
  }
}
</script>
使用UI库的分页组件
如果你使用的是流行的UI库,它们通常都提供了现成的分页组件:
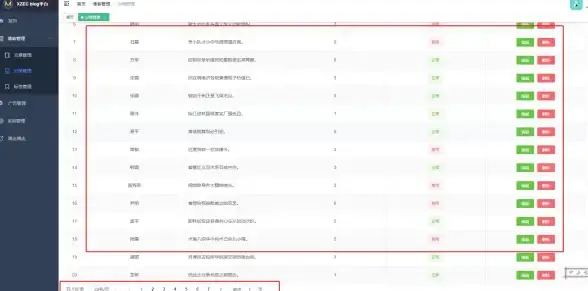
Element UI分页示例
<el-pagination
  background
  layout="prev, pager, next, sizes, total"
  :total="totalItems"
  :page-size="itemsPerPage"
  :current-page="currentPage"
  @current-change="handlePageChange"
  @size-change="handleSizeChange"
/>
Vuetify分页示例
<v-pagination
  v-model="currentPage"
  :length="totalPages"
  :total-visible="7"
  circle
/>
Ant Design Vue分页示例
<a-pagination
  v-model:current="currentPage"
  :total="totalItems"
  :pageSize="itemsPerPage"
  show-less-items
  show-size-changer
  @change="handlePageChange"
  @showSizeChange="handleSizeChange"
/>
分页功能的最佳实践
- 记住用户偏好:将用户选择的每页条数存储在localStorage中,下次访问时自动应用
- 滚动到顶部:分页切换后自动滚动到列表顶部,提升用户体验
- 加载状态:添加加载动画,避免页面切换时的空白状态
- SEO优化:如果是SSR应用,确保分页链接能被搜索引擎抓取
- 移动端适配:在小屏幕上简化分页控件,可能只显示"上一页/下一页"
// 记住每页条数偏好示例
handlePerPageChange() {
  localStorage.setItem('preferredItemsPerPage', this.itemsPerPage)
  this.fetchData()
},
created() {
  const saved = localStorage.getItem('preferredItemsPerPage')
  if (saved) this.itemsPerPage = parseInt(saved)
}
常见问题解决方案
问题1:分页时复选框状态丢失
- 解决方案:使用唯一的item.id作为v-model而不是数组索引
问题2:分页边界条件处理
- 总是检查currentPage是否在有效范围内
- 处理数据为空的情况
问题3:分页与筛选/排序结合
- 重置到第一页当筛选条件变化时
- 保持排序状态跨分页
watch: {
  searchQuery() {
    this.currentPage = 1
    this.fetchData()
  }
}
Vue的分页功能实现起来既简单又灵活,从基础实现到高级功能,我们可以根据项目需求选择合适的方案,好的分页设计应该:

- 让用户清楚知道自己在哪里(当前页/总页数)
- 提供灵活的导航方式(直接跳转、前进/后退)
- 适应不同的设备和屏幕尺寸
- 与数据加载和状态管理良好配合
希望这篇指南能帮助你轻松实现各种分页需求!在实际项目中,你可以根据具体场景对这些方案进行调整和扩展。
本文由 凌海逸 于2025-08-01发表在【云服务器提供商】,文中图片由(凌海逸)上传,本平台仅提供信息存储服务;作者观点、意见不代表本站立场,如有侵权,请联系我们删除;若有图片侵权,请您准备原始证明材料和公证书后联系我方删除!
本文链接:https://up.7tqx.com/wenda/499860.html





发表评论